Showing posts with label applique. Show all posts

Tuesday, 22 June 2021

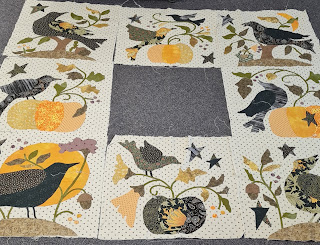
Progress on "The Raven" quilt


Still a few details to go on some of these blocks - a leaf or two, a few berries.  I am finally up to the "most difficult" block, which is a house.


I use the freezer applique needleturn method, which means that i need the design to be reversed. Well guess what, the house in the centre is not quite symmetrical.


I really had to jiggle to get the yellow fabric underneath in the right spots.


I am super glad I left this to be the final block, because it's giving me the push I need to complete it. The "almost there" factor is doing it for me. I can see the finish line... I'd love to have this finished and hanging on my wall at the start of October. 

I really haven't made much for myself this past year, and ravens mean so much to me.

I am so determined to complete this applique block, that I've taken this as my project today to quilt group. I usually take my sewing machine, but no. I am preparing block pieces. It's time.

I am getting so excited!


Wednesday, 13 June 2018

You remind me of the babe

I am preparing for the Townsville Show art and craft exhibit, which I found to be a bit wanting last year. Even the cake display had been reduced to the size of only two trestle tables. I resolved to get involved. I missed the cutoff date last year, as it is a month before the show.
I submitted paperwork to the show organisers to say that this David Bowie small quilt/wallhanging will be finished, and I have only just started it! I had best get on with it!

David Bowie passed away just one and a half years ago, and what an unusual stand alone person he was.  I love this as a tribute.

Monday, 6 March 2017

More applied research into turned edge applique

Everything seems to be going slowly, slowly.

Perhaps it is because I am trying to pay attention to the effects of the applique techniques...

Perhaps it is because I am improving my skills, which takes more time and concentration...

Perhaps it is because I only had about an hour a day to work on my applique..

And then, maybe it is just a lack of faith in my abilities.. like I had forgotten how to "sit into" my skills, and KNOW I've always been good at this stuff, and just let it grow underneath my fingers without second guessing and inspecting everything so much.

However! There is progress!

Hurrah! And I am happy to share some findings once again.

This is a flower with tiny little fiddly curves and sharp points.
circular flower made with two layers of freezer paper, and starch method

Each piece overlays another. In my "old days" stitching applique, I could make the individual shape EASY PEASEY with smooth curves and pointy points, but the pieces would move everywhere and would not overlay, and the outsides probably wouldn't make an even circle. This is why I am trying out different methods. I want precision placement.

For these shaped pieces, this was the best technique for me (double layered freezer paper with starch method, and pieced removed before stitching). The trickiest parts were the curves into the centre of the flower. I used Roxanne's to baste the pieces down, and stitched them very very quickly. With no freezer paper left inside, the sewing was fast.

In direct contrast, the sepal (green bit at the base of the flower, connecting to the stem), had the Floriani fusible stitch n wash still in there. It felt bulky to stitch around compared to the swirls of the flower.

Still to come: I have prepared another circular flower  using the Floriani fusible stitch n wash with starch. It needs to be hand stitched before I decide if I like it.

I love the way the shape came out on this flower. It feels firm and supported.

Floriani stitch and wash fusible left inside flower, edges turned with starch

The Floriani fusible stitch n wash is inside the whole flower. I didn't like stitching the yellow section down as the needle had to go down right through a section of stabiliser on the back of the orange fabric. The wide sweeping curves were easier to turn with the stabiliser than the fiddly curves on the previous flower.

It feels nice to touch, but it was not as pleasant to stitch.

So far, I feel double freezer paper with starch and removing the freezer paper before stitching  is my favourite. The technique needs more practise on my part, perhaps the new Clover 11 iron will help as compared to using my standard sized iron, which is heavy, bulky and blocks my view when turning under seams.


Wednesday, 1 March 2017

Experimental applique techniques with freezer paper

Reporting back on experiments with new (for me) applique techniques.using freezer paper:
almost all shown is now stitched down

For about fifteen years I have been using a single layer of freezer paper fused to the wrong side of the fabric, then I use the needle to turn the edge around the template shape, while pinning the pieces to death. Then I cut a hole in the back to remove the free

With a single layer of freezer paper, if I am painting the seam allowance with starch then turning the edge over and ironing it, sometimes the paper bends on a curve. So that, instead of a sweeping curve, I have a straight bit on a leaf, and a couple of corners. Oops. And the points aren't always so pointy on a leaf, there is a lot of excess fabric to try to squeeze into a leaf tip.

I tried out a double layer of freezer paper, and  instead of painting on starch and ironing, I used a Bostik glue stick. It was so fast to stick the fabric down around the template, but, then you have to wait for the glue to dry.

*I tried it two ways: leave the fabric glued to the template, and stitch it down, but then I had to cut a hole in the back of the fabric to remove the  freezer paper anyway, and the glue held on to fabric tightly. When I removed the paper I felt the stitches were too big. Maybe because there was two layers of freezer paper, or maybe because with all the tugging of the glue, the stitches became a little bit loose.
*loosen the glue and remove the template, iron, then stitch. I didn't like this one either. The seam didn't stay pressed under neatly -  the sweeping curves were lost, and it was hard to glue baste down.

I also tried a double layer of freezer paper with the paint starch and iron method, remove template, re-iron, then use Roxanne baste glue. This one is my favourite so far, but I still need some practise folding under the seams with a big iron. Maybe the Clover mini iron 11 will help to get around corners. I have a little iron, but it doesn't have the fine point, and it gets heavy in your hand holding onto a little handle, and there is no rest, it feels a bit dangerous when I put it down. The seams aren't so stiff as they are with the clear gum.

Next thing to try is this: Floriani stitch and wash fusible product.
Reporting back in the next few days.

The good news is, I am trying all of these out on the actual quilts I am making, and not just sample pieces. What better way is there to learn and improve your skills than to make quilts?

Linking up to Esther's Working on Wednesdays.


Monday, 27 February 2017

Discussing freezer paper applique techniques

For the first flower I thought I would try out a different technique... the next flowers are circular and need to be very precise.  Apparently some people use the freezer paper on the wrong side of the fabric, then use a washable glue stick to fold under the seam allowance. This is how I have attached the purple petals.

working out the first circular flower for Diamond Hill

I thought I would give it a try. First I glued under the vanilla background circle. Uh-oh. Had to remove it from the freezer paper to see through  the fabric for placement of the other (purple) pieces... and if I had left it in, I would've had to stitch right through the double thickness of freezer paper. No, that wouldn't be good for the needle or my finger or my stitches.

The purple petals were turned under using a Bostik washable glue stick (I've been using that brand for years for foundation piecing), then I used Burrows clear gum from Officeworks to baste the petals onto the vanilla circle.

How do I remove the freezer paper?

In the past when using a single layer of freezer paper, I have stitched around the freezer paper, leaving it in until fully stitched. Then I would cut a slit in the background fabric, and remove the freezer paper there. No freying ever occurs as the applique on top prevents exposure of the slit on the top, and once it's quilted nothing can be seen at the back.


back of Diamond Hill block 1, made using my usual needleturn technique

 Even when I have handled blocks for years (as in my Baltimore album blocks which literally took 10 or 15 years to make, and aren't even assembled into a quilt top yet, and Civil War Bride blocks), no damage has occurred by cutting a slit, and no glues were left in the fabric.

The edges on the purple petals above are turned under with glue, and stuck to the freezer paper. I think I will have to hand swish/wash the block to remove the glue before I can cut a slit and pull away the freezer paper without damaging my stitches.  Then, a yellow circle is to be appliqued over the centre of the petals.


Now I am looking at the next circular flower which is different again.


Last night I was thinking to cut a circular background again, and applique every second petal. This will make some of the applique pieces come forward, and some will recede. This is my favourite plan, not just for ease of stitching, but because I like a variety of depths, colours and prints in my work. (Even in jewellery I am not into matching, but prefer to co-ordinate earrings and necklace).

 If I made every petal individually and stitched them, I would have to cut the freezer paper slightly smaller than marked line to account for the thickness of the fabric in the turned under section, then try to line up the outside to make a circle.

Esther also has a tutorial on how to machine stitch those seams when making leaves, but I estimate it would be a bit frustrating for me on a circle where I want the outside to line up perfectly into a circle.

Esther has another tutorial on how to use Floriani fusible stitch n wash, but that still requires ironing over the seam with a starch product, not glueing. I am finding the ironing over to be a bit heavy on my arm, and not all the curved edges are as curved as I would like using the ironing over technique. Hence, why I wanted to try the glue.

There are two circular flowers in the pattern above. I am still wondering whether to use this technique: applique 4 parts onto a large piece of circle fabric, stitch, wash to remove glue, cut slits to remove freezer paper inserts, then iron on a large circle template onto the back, cut out, glue and applique, then wash again later to remove glue, then cut a slit to remove freezer paper. OR this technique: applique background circle first, wash, cut a slit to remove freezer paper, position petals, stitch, wash again.

Either way, with this many layers I see the block being washed at least twice. It's going to be a matter of getting all the flowers to a certain point, then washing to remove glue, cut a slit to remove freezer paper, then add second layer with a second washing at the very end.

I really don't want to wash the block more than twice.

The reason I am trying all these gluing things is to improve the placement of my applique, as without basteing, it seems to migrate all over the place while I sew.

Maybe I just need to try a different iron, and take more time. I have just seen the Petite Press Portable Mini Iron, which looks like you can apply pressure with a finger.

And I've just done a little bit of youtube research.. I think I'll buy the Roxanne glue baste, the Sewline glue stick and the Floriani fuse and wash papers. Giving it a go on this applique journey!

I welcome your ideas, and sharing of your experience with any of these techniques in the comments below.

Thank you.

Friday, 10 February 2017

Leaf it with me

There are a lot more  leaves on the first block of Secret Garden than first glimpsed.


Everything shown on this block is now stitched down.

Because the block is so big, the  applique pieces look relatively easy. But once you start cutting, starching and glueing, there really are a lot of pieces!

By tonight, I am hoping to have all the leaves cut out and glued on so that I can play with flower fabric choices.

The next block of Diamond Hill is due to be released in about 5 days. I have a feeling that I am going to keep up with the preparation of the appliques of both quilts, even if I don't keep up with the monthly stitching every month. That's ok. Diamond Hill goes for 7 months, and some of that looks like machine piecing.

By the end of the year, I would love to have Diamond Hill completed, and a few of the quick kids quilts on my finished quilts list. I can totally see it happening!

Friday, 9 December 2016

Tutorial: How to accurately trim an applique or stitchery block to an unusual size

I've been using my own technique - The Lorraine Lowe technique - for trimming applique and stitchery blocks for years now. It probably goes back to my first time using Lori Smith's quilt patterns as they often end up at odd sizes such as 7 7/8 inch finished blocks.

What do you do when nobody makes a square ruler in the right size?

For this tutorial I will show how I trimmed down oversized applique blocks  (There always appears to be a bit of shrinkage in background fabric during the applique or stitchery. It is wise to start with a bigger piece of background fabric, then trim the block after stitching).

My blocks are from a Lori Smith pattern, with a 13 3/4 inch finished block. This means I need to cut them 1/4 bigger along each edge.

First I have some template plastic with a quarter inch grid on it. I usually like to buy one big piece, then cut it to the finished size of the block, but I am living in a smallish quilting community and this is what I could get.

First I used paper scissors to trim away the clear edges without grid, and sticky taped the pieces together.

Be careful. Sometimes the grid won't line up exactly. It seems to be square in one direction, but not the other

I had to measure with the laser cut yellow ruler, then trim away about 1/8 inch along one edge of the plastic. Now it is square, and it is the finished size of my applique block after piecing in the quilt.


Next I write the size on the plastic with a permanent texta.

Then I mark the centre of the plastic with a permanent texta.

Keep your sticky tape handy. Press the back of the applique block then place it on your cutting mat with the design facing up.

Position the template plastic square using your centre marking AND ALSO looking at how much applique is near each edge. Try to ensure there is a pleasing amount of space around the applique. This is why the grid plastic is helpful.

Sometimes you need to make a choice when placing your template plastic. The  design may be too close to the edge, and you need to choose what to cut off and what to go around. Whatever is covered by the plastic is what will show up in your finished block.

In this block I chose to cut off the bottom of the trees rather than to cut the birds wings.

The template plastic square may need to be placed slightly diagonal, which makes the edges off-grain, and more likely to stretch (be careful!). I choose to keep them as square as possible, but with this particular quilt I was adding sashing, so the block should stay pretty square if I pin each edge very precisely.

When you are happy with the placement, use sticky tape to hold the template plastic onto your applique block.

With your ruler, line up the grid with the ruler lines, allowing the ruler to overhang the template plastic by 1/4 inch. There should be no possible way your rotary cutter can cut the plastic. The cut will be made 1/4 inch away from the template plastic. Cut one side with the rotary cutter. 

Try to leave the block on the cutting mat without picking it up to turn it (I like to cut mine on an island bench). If you do need to lift the block to turn it to cut the next side, lift it gently while supporting the plastic and block together.  Cut each side 1/4 inch away from the template plastic using the ruler to measure.

Lift the template plastic square off the block. The sticky tape will stay attached to the plastic.

Press another block, position the template plastic where it is pleasing, and trim each edge, adding 1/4 inch on each side.

I usually trim my blocks down when I am just about to stitch them into a quilt, so that the freshly cut edges are not handled a lot, and are less likely to stretch if they are slightly off grain.

In this block it was more important to have the petals of the flower an equal distance from the edges of the block, than to have the centre in the exact middle (it may be 1/4 inch skewed, but it is still pleasing to the eye).

In this symmetrical block, lining up the centre vertically was very important or it will look like the flower is leaning to one side.


Thank you for reading my tutorial using the Lorraine Lowe technique for trimming applique blocks accurately.

Please feel free to share the entire post without editing or sampling.